Search This Blog

Showing posts with label Management. Show all posts

Wednesday, November 25, 2015

Cisco ASA syslog through IPsec tunnel

In this scenario we have a Cisco ASA which connected to remote branch using IPsec tunnel and we want to send all syslog 
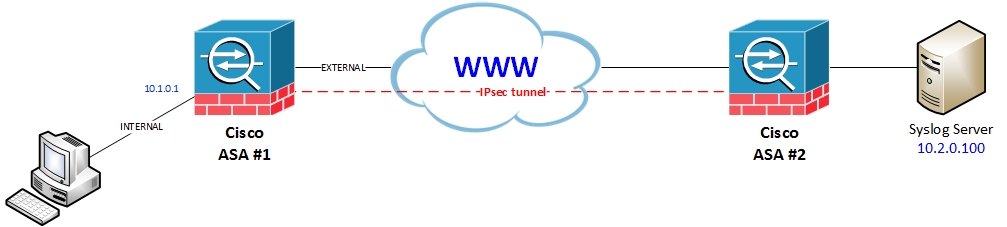
messages to a remote syslog server through the IPsec tunnel.
Network diagram:


For this we will have to use the management interface (and no I don’t mean the dedicated management interface) which can be found under Device Management -> Management Access -> Management Interface:


This feature instructs the ASA which interface to use for management purposes such SNMP, Syslog, icmp replay and more.

When you try to ping the ASA interface you will get an answer only if you reside on the same interface which you tried to ping (and of course allow icmp under Device Management -> Management Access -> icmp).

So back to remote syslog configuration, first configure the interface which you want the ASA will use to send syslog messages, here I select the INTERNAL interface (as in the image above).

Then configure the syslog server as follow:


Note that I choose interface INTERNAL rather than EXTERNAL.

In CLI you may see the following message:

ASA-1(config)# logging host INTERNAL 10.2.0.100
WARNING:  configured logging host interface conflicts with route table entry

Just ignore it, this is a cosmetic issue following bug CSCur60060.

Using Management interface will allow also remote access client to connect to the ASA using ASDM or SSH.

Monday, March 9, 2015

Microsoft Windows NAP for Cisco WLC management access

Configuring Cisco WLC using RADIUS (Microsoft NAP) for management access.
In the following example I’m using Microsoft Windows Server 2008, and it’s the same for Windows 2012, for using NAP (Network Access Policy) server to authenticate users for management access to Cisco WLC.

First let’s configure the WLC as RADIUS client:

Open the NAP console

Press the ‘+’ sign near to RADIUS clients and Servers

Right click on RADIUS Clients and select New

Type in the name of the WLC in Friendly name

Type in the WLC IP address

Select manual shared secret and type in the desired shard secret and confirm it


Click on the Advanced tab and select RADIUS Standard, to finish click OK


Now let’s configure the Policy:

Open the NAP console

Press the ‘+’ sign near to Policies and select Network Policies

Right click on Network Policies and select New


The New Network Policy wizard will appear, type in the policy name


Click next

Click on Windows Groups and add the required group

Click add and select NAS Identifier and enter the WLC hostname


Click next

Select Access granted and click next


Uncheck all and select only Unencrypted authentication (PAP, SPAP) and click next


Under constraints we can choose idle timeout, day and time restrictions or we can just can click next


Under RADIUS attributes->Standard remove Framed-Protocol and change Service-Type to Administrative.


Click on Encryption, uncheck all and check only No Encryption
Click next and then Finish


Now let’s configure the NAP as RADIUS server on the WLC

Login into the WLC

Click on Security->RADIUS->Authentication and click New

Type in the NAP IP address

Type in the shared secret and confirm it

Make sure the Management checkbox is checked
Click apply


Select Security->Priority Order->Management User, add RADIUS to Order Used for Authentication and make sure it’s before LOCAL

Click Apply


That’s it, Logout from the WLC and login again with your domain account.