Search This Blog

Saturday, July 29, 2017

HPE Comware 7 using TACACS with Aruba ClearPass Policy Manager


In the following post I will demonstrate how to configure HPE Comware 7 switch for TACACS AAA services with Aruba ClearPass policy manager and Microsoft Active Directory.

Network Topology


Device/Host
Version
IP Address
VLAN ID
Aruba ClearPass Policy Manager
6.6.5.93747
192.168.0.19
1
HPE FlexNetwork 5510HI JH148A
5510hi-cmw710-system-r1308-US.bin
192.168.0.222
1
Microsoft Windows Server
2012 R2 running AD/CA/DHCP/DNS services
192.168.0.22
1
Microsoft Windows 7
Professional running SecureCRT
192.168.0.16
1

Switch configuration

First configure hwtacacs scheme:

hwtacacs scheme CPPM
 primary authentication 192.168.0.19
 primary authorization 192.168.0.19
 primary accounting 192.168.0.19
 key authentication simple <PASSWORD>
 key authorization simple <PASSWORD>
 key accounting simple <PASSWORD>
 user-name-format without-domain
 nas-ip 192.168.0.222
#

Next configure domain:

domain mlab.local
 authentication login hwtacacs-scheme CPPM local
 authorization login hwtacacs-scheme CPPM local
 accounting login hwtacacs-scheme CPPM
 accounting command hwtacacs-scheme CPPM
 authorization command hwtacacs-scheme CPPM
#

In the following domain configuration we authenticate/authorize and account every login with the CPPM (ClearPass Policy Manager) and also authorize and account every command (which are optional)

Configure the use for default domain:

domain default enable mlab.local

Configure default role:

role default-role enable

Last configure user interface access:

line vty 0 63
 authentication-mode scheme
 user-role network-operator
 command authorization
 command accounting
#

Aruba ClearPass Policy Manager Configuration

Launch the CPPM web interface and go to Configuration -> Network -> Devices and click on Add.

Type in the device name, IP address, TACACS shared secret (the same password as we configured in the switch configuration under hwtacacs scheme) and choose H3C as vendor name:


Click Add to finish.

Next go to Administration -> Dictionaries -> TACACS+ Services, check the shell dictionary and click Export:


An XML file will be saved, open it with text editor (such Notepad++) and add the following two lines:

<ServiceAttribute dataType="Unsigned32" dispName="Privilege level" name="priv-lvl"/>
<ServiceAttribute dataType="Unsigned32" dispName="Roles" name="roles"/>

Shown here marked in yellow:


Next go to Configuration -> Identity -> Roles and click Add.


As roles are only tags on CPPM add two roles – one for network admin and the other for network operator:


Each role will have different privileges while login into the switch.

Now go to Configuration -> Identity -> Role Mappings and click Add,

In the following example I’m using the MLAB active directory as authentication/authorization source and looking at the department attribute (from the AD) to map a role, an account from the IT department will receive MLAB Network-admin role while an account from the helpdesk department will receive MLAB Network-operator role:


Note that the department attribute should be enabled under the authentication source -> attributes.

Next go to Configuration -> Enforcement -> Profiles and click Add
Under template select TACACS+ Based Enforcement and type the profile name:


Click Next

Under Services, select Privilege 15, add Shell for Selected Services and add two following two Service Attributes:


Click Next

Check Enable to permit unmatched commands:


Here we can select the commands that we permit or deny, for the following profile, by clicking Add and type in the required commands.

Click Finish

Repeat this step for the network operator enforcement profile but this time set the privilege level to 1 and role to network-operator:


Next go to Configuration -> Enforcement -> Policies and click Add,
Type in the Enforcement policy name, select TACACS+ as Enforcement Type and select TACACS Deny Profile as Default Profile:


Click Next
Under Roles click Add Rule, select Type=Tips, Name=Role, Operator=EQUALS and Value=MLAB Network-admin. Select Enforcement Profile Comware7_Network-Admin:


Add one more rule for network-operator:


Click Finish

Last we need to configure the TACACS service, go to Configuration -> Services and click Add, Choose TACACS+ Enforcement, type in the service name, check Authorization and add service rules as required, here in this example I used TACACS protocol as match for this service:


Click Next

Under Authentication select the authentication source, in this example I choose the AD:


Click Next

Under Authorization select the authorization source, again here I choose the AD:


Click Next

Under Roles choose the role mapping [MLAB TACACS Role mapping]:


Click Next

Under Enforcement choose the enforcement policy [MLAB TACACS Enforcement]:


Click Next

In the Summary tab click Finish.

Go to Configuration -> Services and reorder the services in order that TACACS service will be first:


Verification and information

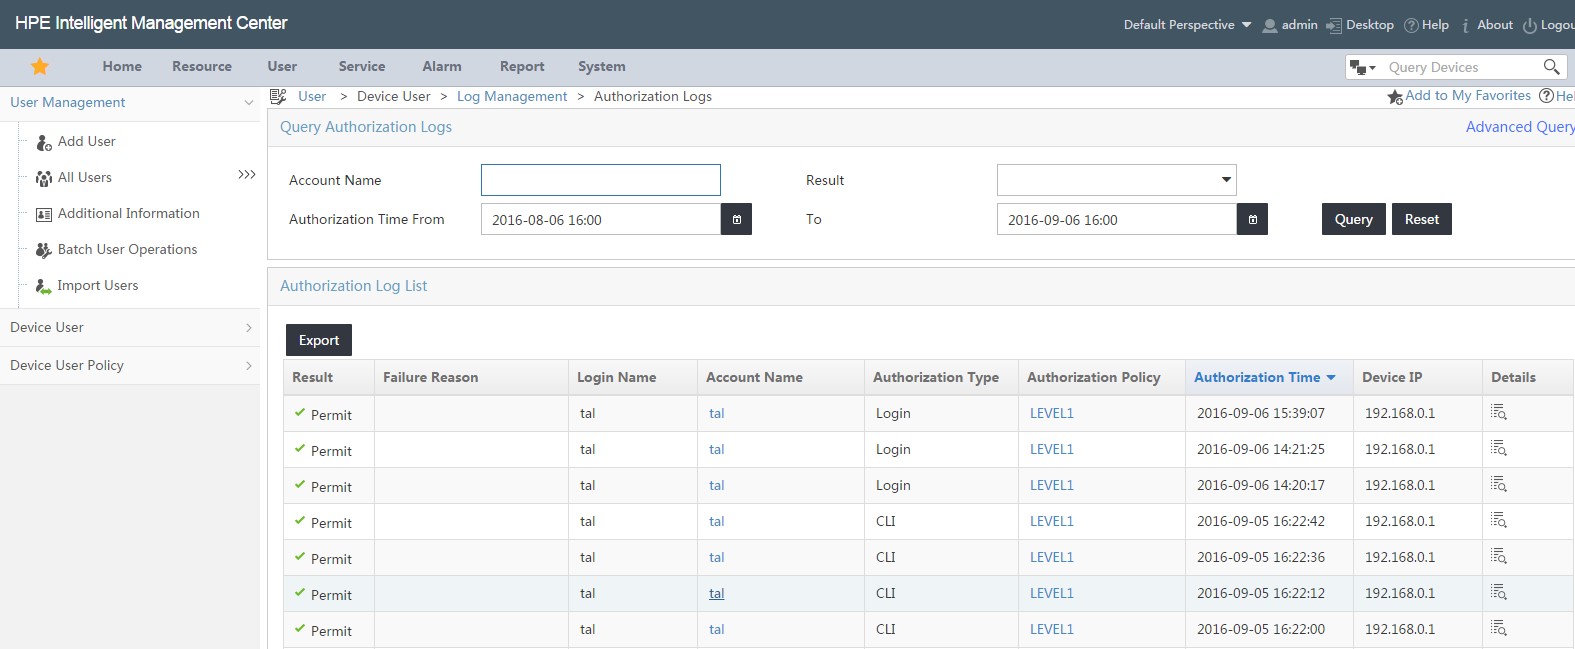
Under Monitoring -> Live Monitoring -> Access Tracker we can see the authentication and authorization commands:


Under Monitoring -> Live Monitoring -> Accounting we can see the start/stop session time and the command that issued by each user:


Next post i will explain how to configure Wired 802.1x policy along with web health check and MAC authentication.


Tuesday, September 6, 2016

HPE IMC - TACACS+ Authentication Manager (TAM) configuration


IMC/TAM Configuration


1.    Configure Device Areas 
1.1  User -> Device User Policy -> Authorization Conditions -> Device Areas
1.2  Click Add
1.3  Enter area name and description


2.    Configure Device Types
2.1  User -> Device User Policy -> Authorization Conditions -> Device Types
2.2  Click Add
2.3  Enter type name and description

3.    Configure Devices
3.1  User -> Device User Policy -> Device Management
3.2  Click Add


3.3  Enter shared key, authentication port (default TCP/49), choose device area and device type


Single Connection – the TAM will use single connection for multiple sessions
Watchdog – send keep alive (only if device supports)
Authentication Port – Change port on the device CLI to match the TAM port, default is TCP/49
            Device CLI authentication port configuration:
[HP]hwtacacs scheme TEST
[HP-hwtacacs-test]primary authentication 192.168.0.10 5555

4.    Configure time range
4.1  User -> Device User Policy -> Authorization Conditions
4.2  Click Add
4.3  Enter policy name and select effective and expiration time


5.    Configure Shell Profiles
5.1  User -> Device User Policy -> Authorization Command -> Shell Profiles
5.2  Click Add
5.3  Enter profile name, ACL, privilege level, idle time and session lifetime


            ACL – access control for user access, ACL must be configured on the device
            Idle Time – set the maximum idle timeout for user session, in minutes
Session Lifetime—Duration that a user can manage the device after login. When the session lifetime timer expires, the user is automatically logged out.
6.    Configure Command Set
6.1  User -> Device User Policy -> Authorization Command -> Command Sets
6.2  Click Add
6.3  Enter command name, default authorization action and description


7.    Configure Authorization Profile
7.1  User -> Device User Policy -> Authorization Profile
7.2  Click Add
7.3  Enter authorization policy name and description
7.4  Click Add


7.5  Choose the appropriate profile attributes - device area and type, time range, shell profile and command sets


8.    Add Account
8.1  User -> Device User -> All Device Users
8.2  Click Add
8.3  Enter account name, user name, password and choose user authorization policy
8.4  Set maximum online users


HP Comware switch configuration


# Configure default Tacacs domain
domain default enable TEST
# Define default ip of the Tacacs+ server (not mandatory)
hwtacacs nas-ip 192.168.0.10
# This scheme define what features to use through Tacacs (authentication,authorization and / or Accounting)
hwtacacs scheme TEST
primary authentication 192.168.0.10
primary authorization 192.168.0.10
primary accounting 192.168.0.10
nas-ip 192.168.0.1
key authentication Qwer1234
key authorization Qwer1234
key accounting Qwer1234
user-name-format without-domain
# Associate Tacacs+ domain to the scheme (first try authentication trough Tacacs+ and if not working: locally)
domain TEST
authentication default hwtacacs-scheme TEST local
authorization default hwtacacs-scheme TEST local
accounting default hwtacacs-scheme TEST local
authentication login hwtacacs-scheme TEST local
authorization login hwtacacs-scheme TEST local
accounting login hwtacacs-scheme TEST local
authentication super hwtacacs-scheme TEST
authorization command hwtacacs-scheme TEST local
accounting command hwtacacs-scheme TEST
access-limit disable
state active
idle-cut disable
self-service-url disable
# Definition of user interface
user-interface vty 0 4
authentication-mode scheme
command authorization
command accounting

Configuration example details:
-         - TEST is the TACACS domain name
-          - Qwer1234 is the PSK with the TACACS server
-          - Switch IP address: 192.168.0.1
-          - IMC/TAM IP address: 192.168.0.10

LDAP Integration

     1.    Go to User -> Device User Policy -> LDAP Service -> LDAP Servers
     2.    Click Add
     3.    Enter the required information


Base DN example: ou=xxx;o=yyy;dc=hp;dc=com
Admin DN example: cn=administrator;dc=hp;dc=com

TAM Self-Service portal

TAM self-service portal allow users to view/modify account settings for their personal account.
Login into:

http://<IMC_SERVER_IP_ADDR>:<PORT>/imc/noAuth/tam/login.jsf

System Settings

User -> Device User -> Service Parameters -> System Configuration


Here we can setup the log database size and password policy

How-To

To view all device users list:
User -> Device User -> All Device Users


To view all online users:
User -> Device User -> All Online Users


To view all authentication logins:
User -> Device User -> Log Management -> Authentication Logs*


To view all authorization logs:
User -> Device User -> Log Management -> Authorization Logs*


To view all audit logs:
User -> Device User -> Log Management -> Audit Logs*


*Note you can click on details for more verbose information

To validate system configuration:
User -> Device User -> Service Parameters -> Validate


To validate switch configuration:

Use the command: display hwtacacs <SCHEME_NAME>

Example:
[HP]display hwtacacs TEST
  ---------------------------------------------------------------------------
  HWTACACS-server template name     : test
  Primary-authentication-server     : 192.168.0.10:49
  Primary-authorization-server      : 192.168.0.10:49
  Primary-accounting-server         : 192.168.0.10:49
  Secondary-authentication-server   : 0.0.0.0:0
  Secondary-authorization-server    : 0.0.0.0:0
  Secondary-accounting-server       : 0.0.0.0:0
  Current-authentication-server     : 192.168.0.10:49
  Current-authorization-server      : 192.168.0.10:49
  Current-accounting-server         : 192.168.0.10:49
  Nas-IP address                    : 192.168.0.1
  key authentication                : Qwer1234
  key authorization                 : Qwer1234
  key accounting                    : Qwer1234
  Quiet-interval(min)               : 5
  Realtime-accounting-interval(min) : 12
  Response-timeout-interval(sec)    : 5
  Acct-stop-PKT retransmit times    : 100
  Username format                   : without-domain
  Data traffic-unit                 : B
  Packet traffic-unit               : one-packet
  -------------------------------------------------------------------